Dashboard Overview: Settings Section
Hey there! Congratulations on making it to the final steps of the third module.
Now, it’s time to see a step-by-step guide on Settings. You’ll see a playbook below with every set-up you might do within the Settings section of your Dashboard.
We cover Accounts, Permission Groups, Domains, and everything else you can find on the drop-down menu.
To see the step-by-step instructions, click on the desired setting. After you’re done with it, you can mark the checkbox to keep track of all settings you applied.
Enjoy!
Proudly made with
1. Accounts
The first setting you’ll see on the Settings drop-down menu is Accounts.
Here, you can see all user accounts created, create new accounts, and set specific permissions for those accounts as well.
Let’s start by covering how to create a new account!
To do that, first, click on this green button called “New user”.

Next, you’ll need to fill out the information about that user’s account.
Starting with an email address. Remember that users receive the link to set up their account at the email you insert here.

Then, set permissions for that new user account.
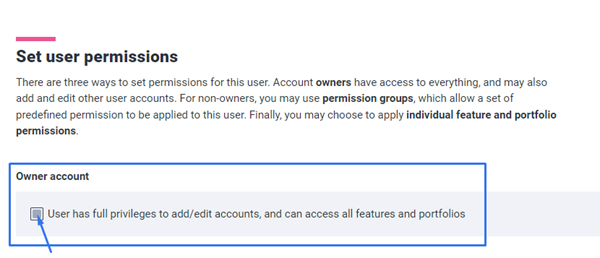
You can opt to make it an Owner Account, which allows users to add and edit other accounts, and have access to all features and portfolios.

Or you can set up specific permissions for that user.
You can opt to give the user access to certain portfolios and features within Ion.

To wrap it up, click on Save.
After that, the new user will receive an email to set up their login credentials and account.


Now, if you want to edit an existing user account, just click on it to see the same settings you just covered.
Apart from the username and making it an Owner account, you'll be able to change every other setting. And now that the user was created, you're able to add it to a Permission Group too, which we'll cover in the next topic.
Make all the changes you would like and click on Save.

💡 Remember that only Owner Accounts have this permission. If you don’t see the “New user” button or if you cannot edit permissions for existing users' accounts, you might not have access to it.
2. Permission Groups
The second setting you’ll see on the Settings drop-down menu is Permission Groups.
Here, you can add groups with users that have access to specific resources and portfolios throughout the platform.
By adding a permission group, you won’t need to manually edit each user account to permit them to access a new feature or portfolio — you can simply set that up for the entire group.
Let’s see how to create a new permission group!
First, click on this green button called “New group”.

Next, write down a name for your group.
You can also add a description if you like, but that’s optional.

Then, set feature permissions for that group.
You can give them access to Data management, Sell-sides, Live experiences, and editing Libraries.
To do that, mark the checkbox of the feature you want to give them access to.

Next, set portfolio permissions for that group.
You can give them access to all/none of the portfolios, or just a few selected ones.
To do that, mark the checkbox of the portfolio you want to give them access to.

If you have SSO enabled, you also have the option to set up some SSO attributes for that group.
The single sign-on is a feature that allows users to access multiple systems, even independent ones, with the same username and password.
That means users don’t need a user account in Ion to access portfolios and features — the access happens by the IdP (Identity Provider).
You can configure the SSO of permission group managers and editors. All you need to do is add the SAML attribute value in each field accordingly.
To wrap it up, click on Save.

After that, you’ll have to add users to that new permission group.
To do that, you just have to edit an existing user account to add it to the permission group. Here you can choose if that person is an Editor or a Manager no that group too.
After you make those changes, click on Save.

💡 Remember that only Owner Accounts have this permission. If you don’t see the “New user” button or if you cannot edit permissions for existing users' accounts, you might not have access to it.
3. Domains
The third setting you’ll see on the Settings drop-down menu is Domains.
Here, you can set up branded domains and subdomains.
Since users will see the specific domain or subdomain of your URLs, it’s highly recommended you do these settings before building your interactive experiences.
As you know, your Ion console already has a dedicated subdomain and it looks like this:
However, when launching your experiences it’s recommended that you use a branded domain or subdomain instead, like this one we use for Rock Content creatives:
To do that, the admin responsible for your website should create a specific domain or a subdomain for your main site.
Then, they will need to create a CNAME record to point the DNS to your Ion dedicated subdomain — “www.yourcompanyname.postclickmarketing.com”.
After that, you can set up that domain here in Ion.
First, click on this green button called “New Domain”.

Next, write down the domain name.
Remember that it should be unique, and already set up and pointed towards your Ion dedicated subdomain.
You can also choose if that will be the default domain for the console or not.

Then, choose the Brand Space you would like to associate the domain with.
The option “Dissasociated” will be selected as a standard, but remember to always change it to the Brand Space you created if you have acquired the add-on.
If you haven’t upgraded or set up Brand Spaces, change it to Main.

Next, choose an HTTPS option between a Free certificate, using your security certificate, or none.
A Free certificate uses a free option to make the domain or subdomain safe. When in doubt, select this option.
With a certificate, your URL starts with “HTTPS” instead of just “HTTP”, which indicates to visitors that’s a secure webpage.

Then, you’ll see some redirect settings.
First, the Redirect URL for whenever users go to a URL that doesn’t exist.
Next, is the Redirect action. If you are not sure about the options regarding query string and path, keep the “Go to the redirect URL ‘as is’” option selected.
This way, users are counted as unique visitors when being redirected.
Last, we have the Redirect type, where you can choose between a temporary redirect (302) or a permanent redirect (301).
When in doubt, we recommend keeping the redirect as a temporary one.

After these settings, you’ll see technical settings.
The first is the sitemap. Here you can choose between including an auto-generated sitemap in your robots.txt file, or not including it.
Next, you have the option to add custom information to your robots.txt file.
You could remove some pages, for example, since the console robots.txt allows crawlers to access all pages by default.

Last but not least, you can upload a custom favicon to that domain.
Let’s say you’re setting domains for different products or sub-brands: you can also add a specific favicon to appear on the navigation tab whenever an experience has that specific domain.
Just remember to upload an .ico file that’s 16x16px or 32x32px.
When you’re done setting up your domain, click on Save.

💡 Keep in mind that adding a domain will result in up to a minute of console downtime.
4. IP Restrictions
The fourth setting you’ll see on the Settings drop-down menu is IP restrictions.
Here, you can restrict certain IP addresses from visiting your pages or you can block certain IPs from being included in your Ion reports.
To do that, first, click on this green button called “New IP restriction”.

Next, add the IP address you would like to fully block or just stop tracking its respondents.
Then, select the restriction you would like to apply to that IP address.
You can fully block it by selecting a 403 (Forbidden) or 404 (Not found) response. That means traffic from that IP address you get that message shown.
Or you can allow traffic from the IP, but specify some restrictions. It could be to auto-delete tracking within an hour or treat the IP as a crawler/bot so they can visit without being tracked.

Select the option that better suits your needs then click on Save.

5. Capacity & Monthly Traffic
The fifth setting you’ll see on the Settings drop-down menu is Capacity & monthly traffic.
Here, you can monitor your console’s capacity and traffic for the current billing period, and even opt to delete respondents.
Right when you open these settings, you’ll see your respondent’s capacity versus the total number of respondents stored in your console’s database.
You will also see the number of respondents for the billing period and how much that number represents.
You can delete respondents by clicking on the button highlighted below if you’d like.

Then, you find different options to delete respondents.
You can delete them by date:

You can delete them by IP address:

And you can opt for manual or automated deletion of suspicious clicks.
If you opt for manual deletion, you can download a CSV of all suspicious respondents before opting to delete them or not.
If you opt for automated deletion, respondents responsible for suspicious clicks will be deleted automatically every night.

6. Configure Site
The sixth setting you’ll see on the Settings drop-down menu is Configure site.
Here, you can change some settings for your website.
The first few options are to add a favicon for the browser, a co-brand login logo, or a co-brand site logo.
For the favicon, remember to add an .ico file that’s 16x16px or 32x32px.
For the logo icons, make sure they have a maximum width of 150px and a maximum height of 85px, 10k, and a fully white background (#FFFFFF).

Next, you can set up a default URL and a default Quick Start Cloud theme for your console.
The URL must begin with http:// or https:// and could be your website URL, for example.
The Quick Start theme should be the one you use most often on your creatives, in case you opted for more than one theme for your console.
Adding a specific brand theme as default will ensure that every new creative already starts with it.

Then, you find SMTP settings.
SMTP stands for Simple Mail Transfer Protocol, an application used by mail servers to receive, send, and relay outgoing mail between email senders and receivers.
To set it up here, you must add the SMTP hostname, account, and password and the SMTP sender address.

Lastly, you see three other settings for your console.
The first one is the percentage for gauge confidence interval — it can be 80%, 90%, 95%, or 99%.
The confidence interval is the mean of your estimate plus and minus the variation in that estimate. An 80% confidence interval, for example, is a range of values that you can be 80% certain contains the true mean of the population.
The other two are to allow the sharing of cookie consent across creatives by default and/or to require creatives to have a cookie consent page before engaging.
When you’re done setting up, click on Save.

💡 Keep in mind that these settings might be more complex, and should not be applied if you are not certaint of how to set them up.
7. Certificate Signing Requests
The second to last setting you’ll see on the Settings drop-down menu is the Certificate signing request.
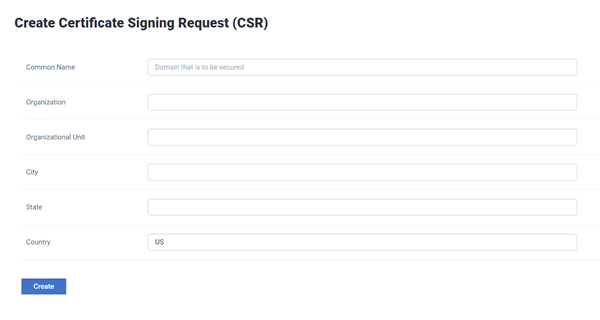
That means, here is where you can create a CSR to then build an SSL Certificate.
To do that, you will need to choose a domain or subdomain, and provide:
- Common Name, such as “www.yoursite.com”, which represents the fully qualified domain name (FQDN) of your server.
- Organization, or the legal name of your organization (do not abbreviate or include any suffixes)
- Organizational Unit, the division of your organization handling the certificate
- City where your organization is located (do not abbreviate it)
- State where your organization is located (do not abbreviate it)
- Country, the two-letter code for the country where your organization is located

💡 We recommend contacting your Account Manager or Support in case you’re interested in creating a CSR.
8. Upload Cert.
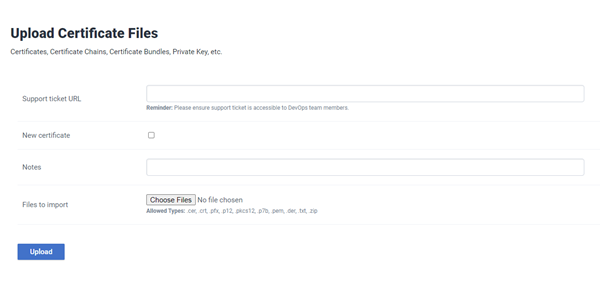
The last setting you’ll see on the Settings drop-down menu is the Upload cert.
Here is where you can upload certificate files, chains, bundles, private keys, etc.

💡 Keep in mind that you should contact your Account Manager or Support before uploading any information on these settings.